Sunday, June 15, 2014

EVOLUTION OF MY MOOKAS #8 : Update (finally)

Oh my! I did not realize that I haven't updated this blog in 10 months!  Sorry!  Last June, I started a FaceBook group, Zentangle Explorations. I had never started a FB group before and had to learn a lot of new things.  The group was designed to be a place where tanglers (and doodlers, etc) could post their works in whatever media they were working.  It was also to be a place where people could get not only inspiration, but also help to learn more about this new art form.  The group took off and grew much more rapidly than I ever dreamed it would. We are finishing our first year of existence and this week we registered our 1800th member and already are approaching number 1900!  As you can imagine, it was taking more and more of my time every day to maintain it. Also, I was teaching at the local Senior Center.  I teach a 10-week course to seniors who are just entering the world of computers and internet.  Many of them have never even seen a computer. By the end of the 10 weeks, they not only can run programs on their computers and use e-mail and surf the internet safely, they have learned how to care for their computer systems to prevent damage and wear and tear, etc.  On top of that, I have started teaching a Zentangle Inspired Art group at the senior center.  It meets once a month for 3 hours and is entering its 7th month of existence.  No, I am not a Certified Zentangle Teacher.  However, I am a ZTA, as you probably are too.  What is a ZTA?  That is a ZENTANGLE ARTIST, or perhaps more truthfully, a ZENTANGLE ADDICT!

Finally, I admitted I had too much on my plate and asked for help. The members of the Zentangle Exploration group are so wonderful and helpful.  I now have two co-administrators.  They have taken on some of the work of maintaining the group. It is wonderful! They are doing a marvelous job and I now have some free time to do things which I had let go for awhile. This includes working on this blog, doing some of my own tangling, writing some articles for the ZE group newbies, etc.  This week I posted 2 parts of a projected 6 or 7 part article about the different grids that are used in tangling and how they are used, how they can be used to change the basic tangles, etc.

And for this blog?  Yes, I definitely have some new things to post here.  As far as growth in Mookas, I have a new 'grinch' mooka, and 2 or three more that don't have names yet. I also need to post several new tangles.  I also have several new desert tangles in development. Oh, yes, some new sources for tangling materials, such as black round coasters to tangle on with white inks, colored inks, metallic inks, etc.  I have also developed a "Tangle Selection Kit" for those times when you just can't make up your mind what to use, or what project to start.  Actually, the paper part of the kit is available for free in the ZE files.  You just need the special dice (24 sided) to go with it.  (Will post the source in where to find ZT equipment here.)

As you can see, I have been very busy preparing to update this blog.  I plan to bring it up to date by next weekend.  This is just a  notice that the blog is active again and to whet your appetite. <grin>

Until next week, meet the Grinchy-ooka and Happy Tangling!


Saturday, August 31, 2013

EVOLUTION OF MY MOOKAS #7: Swoop and Flora

It has been a couple of weeks since the last posting.  Many things have happened in that time. The new Facebook group, Zentangle Explorations, has gained more than 100 members in less than 30 days.  As planned, this group discusses and displays a wide variety of topics. We have members who are tangling in clay. . . . IN CLAY!!! Others are tangling on eggs, some are carving egg shells with zentangle designs. One member is looking into etching tangle designs onto glassware.  Wonderful variations there.

Another new group: Ornate Animal Illustrations was started by Ben Kwok.  We have all admired his animal artwork. It is different and beautiful.  In this new group, Ben will post some of his animals in template form. These are to be downloaded by members, tangled, then uploaded to the site again, to share with other members.  His group has had phenomenal growth, reaching the first 100 members in less than 48 hours!  The first two templates were a flycatcher (bird) and a Dragonfly.  They were lots of fun to tangle.  (Yes, I tangled one of each and uploaded them.  :) 

With all of this going on, I have not had much time to experiment with the Mooka.  However, there have been two new developments.The first is one I developed with flower blooms developing from the fronds and the second is a modification I came across while surfing the internet.  To take the second variation first, the mooka fronds are drawn out with thread-thin stalks and elongated teardrop shaped fronds.  This gives a larger area inside the fronds for coloring, or blending colors, or for including tangles, or even faces.  It also makes it much easier to draw the fronds interweaving or braiding.


This shows the interweaving or braiding of the fronds.


The second variation was developed after seeing a tangle pattern for quilting a quilt.  First, you draw the mooka in whatever form you wish.  Next, you extend the frond stalk into the end of the frond to form something like a spiral:
Then, starting at the inside of the spiral, draw a small single leaf, Move outward a little and draw another leaf, a little larger.  continue in this manner, working you way around the spiral.'


Finally, continue working you way down the stalk.  Go back, then, and fill in the blank spaces between the petals:


You can then embellish the mooka however you want.  I have shown cirliques above. Below, a mooka is partially hidden behind a netting.

Well, I hope you have found something interesting here this week.  I hope to see you in about another week. :)


Sunday, August 11, 2013

EVOLUTION OF MY MOOKAS 6:Transparency & holes

Well, some time has passed since my last posting.  However, much has happened in the meantime. I have added a new page, "About Zentangle".This now contains links to the official Zentangle website where they explain all about the Zentangle process. You can find out just about anything about Zentangle you need. 

Other new additions to the blog include a "How to . . ." page. This will have short articles and links to articles on how to do things that might be of interest to tanglers.  Currently, there are instructions on unclogging pen tips of Sakura Micron  pens and Gel pens and how to keep from clogging the pen tips in the first place.  Also how to use a paper clip to remove a DVD disk from a stuck disk drive, etc. 

The final new page is the "Projects" page. This will eventually have links to ways people are using tangling besides just on paper tiles, as well as instructions for doing them.  Currently, there is just an outline of items I am planning on covering there.  You can always leave a comment and ask for a specific item/instruction.

All of the other pages have been updated and new materials have been added. You might want to check these pages out.

Also, I have started a new group on FaceBook: ZENTANGLE EXPLORATIONS.  This group is for discussing alternate ways of using Zentangle: on other media, using different media, pens, brushes, soapstone, etc. It is amazing to see where zentangle has gone!  I see this page as a place to get instructions for new/different procedures, evaluations of tools, etc.  It is possible to save documents in that group, as well as short videos you may have made. One interesting thing: (1) how to turn a wooden wine box into a light box, and (2) how to use your monitor screen as a light box for tracing, etc.  No selling is allowed in the group, but people are welcome to put links to their blogs or web pages or to use private messages to purchase or sell things. All are welcome to join the group and once a member, members can add other people from their 'friends' lists..
~~~~~~~~~~~~~~~~~~~~~~~~~~~~~~~~~~~~~~
Now, back to the main topic, the evolution of the Mooka in my world. The latest new way to use mooka is as a window or magnifying glass.  As an example, we have:

Here, a mooka frond has a window in it and we are looking through the "mooking glass".  In the top, we can see the tangle called "fescu" used as a mooka shown at a distance, with one fescu magnified by the mooking glass. I need to remember that when something is magnified, it is also 'moved' to the side a little as it is enlarged, like this:
As you can see, the picture as seen through the magnifying glasses here have not only been enlarged, but have been shifted to the right.  The greater the amount of magnification, the more the item is moved to the side.

A second item I worked with was how to display transparency or translucency.  Since the beginning, in Zentangle, we have always "passed behind" when a new line got to a line that had already been drawn.  But that assumes that the first object (indicated by the line) was solid and opaque.  In the real world, that is not always true. OK, I have to admit that most of the time it is true, but not always.  There are times when you will be able to see through the item at least a little.  How can this be displayed in a Zentangle?

If the first item is translucent, like frosted glass, in the real world, you cannot see an accurate picture of the item placed behind, but you can see a little, like the edges of the second item, and a little of the shading and highlights.  This can be indicated by using dotted or dashed lines to indicate where the edge of the hidden item is.  Something like this:

Follow through with the pattern of the hidden itam, but use dotted or dashed lines. The more translucent something is, the more lines or dots you use, and they are closser together. You can also use a very pale shading to indicate the hidden object:


After shading the hidden object, go back and shade the front object the way you would do normally. The shading of the front item will lighten the shading done on the back item somewhat. 

One final method of showing translucency is to change the thickness of your lines.  Use a solid line, but one that is drawn with a finer pen point.  In this sketch, the difference in the thickness of the line is emphasized.  You don't have to have that much difference:


OK, the last tricks are not mentoning mooka.  However, as Mooka has grown, the fronds get longer and end up crossing each other as well as crossing behind other items in the Zentangle.  There are opportunities to show transparency, or magnification.  this can add a lot of interest to your artwork.  However, suggestion: just don't go overboard with this. Use it sparingly to emphasize those area where you DO use it.

Until the next time, HAVE FUN!

Thursday, July 18, 2013

EVOLUTION OF MY MOOKAS Part 5: Sporulation

In the last few weeks, a lot has happened. Continuing along the line things had been developing, Something new has developed.  I had been working along the lines of the Mooka having reproductive capabilities.  Along those lines, I started thinking about when the plant became mature and would release its 'spores'.  The first attempts looked something like this:
First attempt at spores.


 I decided I wanted to show a few of the swollen ends of the fronds rupturing to release the spores (not seeds).  I ended playing with the ends to see what looked the best.  I also wanted to play with the 'spores' to see what worked.  I went through a whole series of changes:

This one is closest to what I envisioned.!
I finally settled on a rounded, poppy-like thingy opening. The best page in my book showing this is here:
 I also decided that when the swelling burst, the 'spores' should shoot out and away, like the seeds in a Bird of Paradise plant.  But, how could I show that in a static picture?  Finally, I decided to try to use something I used to see in comic books, some trailing lines that get smaller as you move away from the thing in motion. That meant it would look something like:


Well, tonight I started playing around with this idea. I have several examples.  One nice thing about this is it can be used to fill a fairly large space.  The Mooka at the bottom or side, and the spores shooting everywhere to fill the area!


Notice one of the swellings has "rupture lines" where it will split.


I am now satisfied with the concept. Now, I need to play with it in zentangles to see how it works for real. Until next time, enjoy.
Millie g.

Wednesday, June 26, 2013

EVOLUTION OF MY MOOKAS Part 4: Mooka as strings

In the last 2 weeks, I have a few more innovations to the Mooka tangle.   One was to decorate the swollen heads on the ends of the fronds. This leaves room for numerous embellishments:

A second innovation was to use the tangle known as "fescu" to represent the mooka seen at a great distance:


Have you ever thought of using a tangle as a string?  For example, use Mooka to divide the area of the tile. Next, fill in the space inside the tangle:


Another way is to use the string (Mooka) to divide the tile, then to  decorate the external areas of the ATC or ZT card.  


I found out that if you try to do both, decorate both inside and outside of the Mooka itself, you lose the Mooka in the artwork. I personally feel the Mooka needs to be emphasized in either case.


Sunday, June 23, 2013

EVOLUTION OF MY MOOKAS Part 3: Mooka leaves

By the end of March, 2013 I had learned to draw the Mooka correctly. I had also created the inside-out variation along with the outward bent mooka.  Additionally, I had developed the ability to 'look through holes' at something beyond the active layer. I had also developed the movement or growth of something through the holes in one level of the drawing as well as 'floating' an object above the main plane of the drawing.

March, April and May were also spent investigating variations in the form and shape of the Mooka itself. The Mooka is a very organic tangle. As such, I viewed it with reproductive organs.  Toward the end of February, I came across a mooka variation by Daniele O'Brien CZT showing small leaves on the ends of each mooka frond.  She also demonstrated fronds which were elongated and which criss-crossed. This was a novel idea to me and one that intrigued me. I spent time with my sketchbook trying different variations of these two ideas. 


I decided that I liked the philodendron type leaf better than the smaller leaf that Daniele showed. 
The next development was to draw a mooka with blossoms, buds and fruit on it.
Somehow, this just did not seem "mooka-ish".  It destroyed the original feeling of the Mooka. Therefore, I went back to the philodendron-like leaf and  let is 'spread out' and bleed into other, neighboring spaces.

Somehow, this seemed natural. If you have had philodendrons, you know how they can spread.  I made several ZIAs using this 'bleeding leaf' and it seemed really natural.


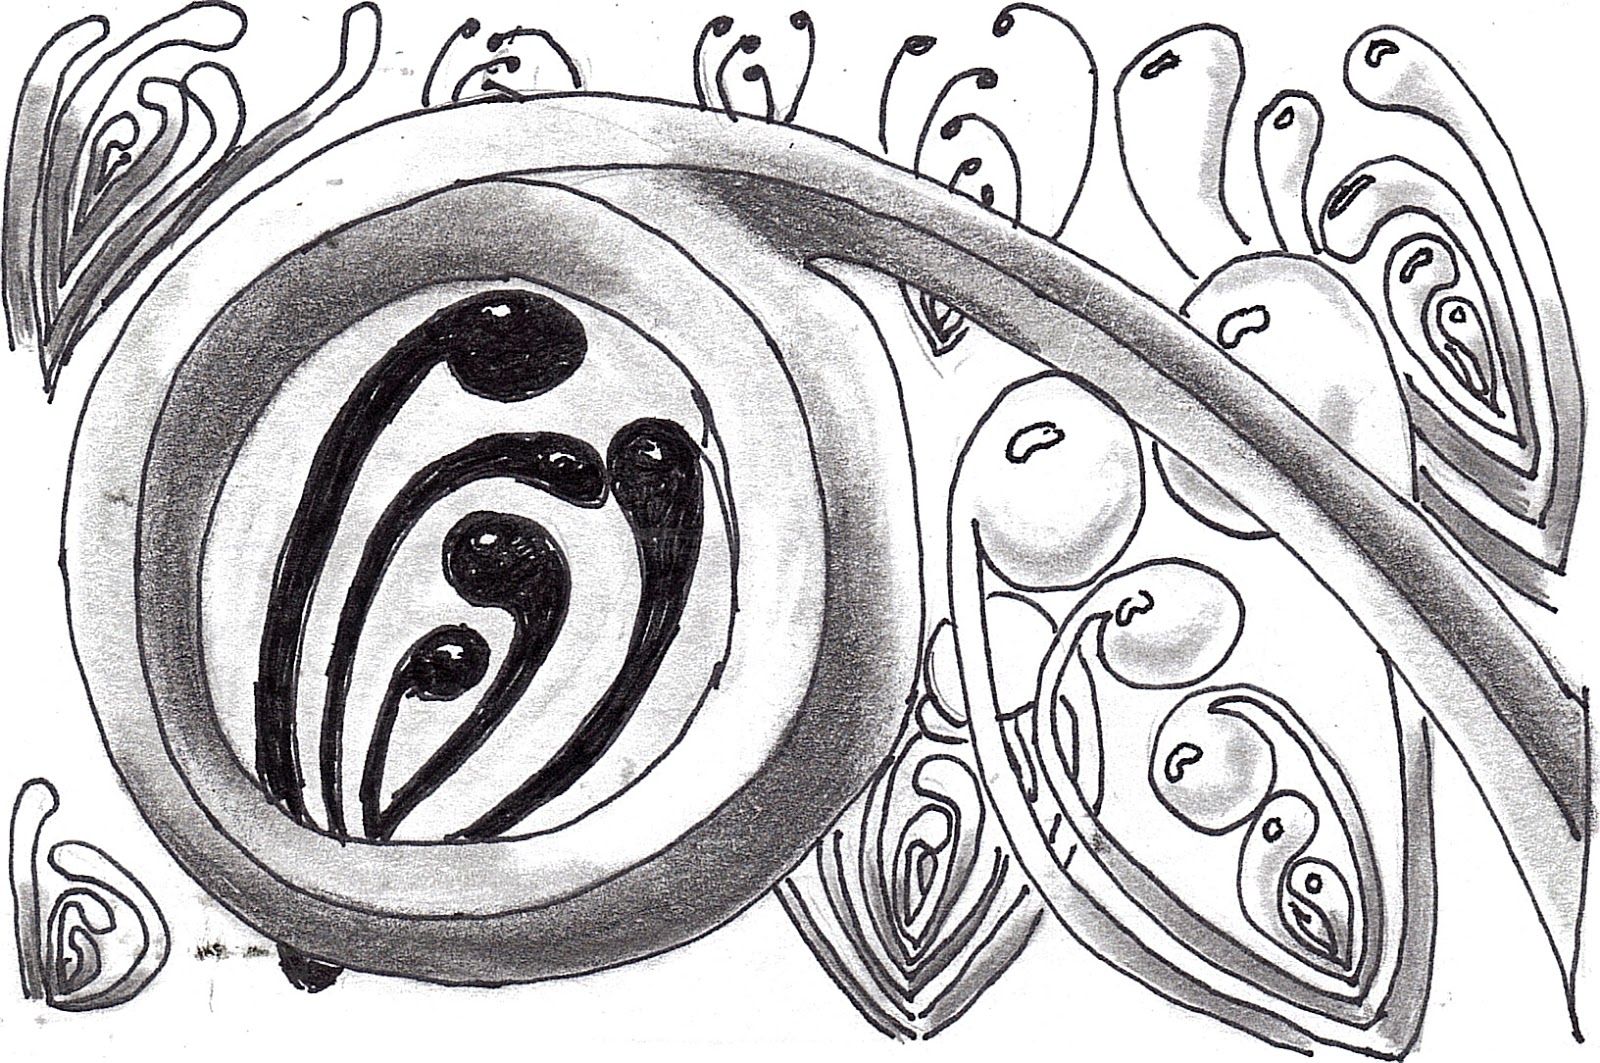
One of the Mooka ends I had played around with was bulbous swellings on the tips, sort of like spore cases.

While the note on the drawing says this was after seeing the You Tube presentation, This was acturally BEFORE I saw the you tube presentation.  However, I did finally see Rick Robert's and Maria Thomas' you tube presentation of the Mooka.  I truly fell in love with Rick's way of drawing the "spore-heads" and practiced it until it seemed to come naturally.


Somehow, the more I worked with the Mooka, the less the philodendron leaves seemed to fit. Again, I tried several variations and on April 11, I finally found perfection.  Somehow, Mooka seems somewhat fern-like. Definitely not a flowering plant. The perfect 'leaf' for the Mooka is a GYNKO LEAF. The gynko is a living fossil.  At one time, the gynko and its relatives formed the majority of the plants on the face of the earth.  Today, I believe there is only a single species still living on the face of the earth.  It has a very strange leaf, different from all other leaves on the face of the earth.  I gave the Mooka a gynko leaf. I also gave it a POD for reproduction.  Now, the Mooka seemed almost perfect.
There seemed to be only one thing left. For further reproduction, the Mooka had to have 'runners' (sometimes called rhizomes) that grew along under ground, and sent up new Mooka plants periodically.  You know, kind of like Bermuda Grass.
If you put this all together, you get something like:


Yes, there is an alien-ness to the Mooka.  It is something that could grow on another planet.  It is also something that could have grown on our own planet several million years ago.  Is it possible it still grows somewhere on our planet today?  I don't know.  However, I am as hooked by the Mooka as I am by the whole Zentangle concept.

We will just have to see. The Mooka, like most Zentangle tangles are living, changing things. Depending on the person using them, they will change.  We will just have to wait until next month to see the next installment.   Until then, keep on exploring . . .


Saturday, June 22, 2013

EVOLUTION OF MY MOOKAS Part 2: Through or floating above

In February and March, I got more adventurous.  In early February, I became interested in forming holes in a tangle and looking through the hole to see something beyond the layer.

At first, I just used one 'hole' on each ZT.  However, after awhile I added additional holes.  Sometimes all of the holes viewed the same materials, as shown above.  Later, each hole viewed something different.

After looking through holes, I started wondering what would happen if something came through the holes?  This led to a variety of attempts to show this.


Finally, I got the hang of it, and creeping through holes started showing up regularly in my artwork.


Hmm, looking through at a different level, passing through from one level to another, that left just one thing to explore, in my mind at that time -- floating above.


Actually, what I found was that "looking thru" and "floating above" were basically the same, The only difference came with the shading. When 'looking thru', the deeper item is shaded, and may even have a shadow cast on it by the more superficial tangle.  When 'floating above', the floater casts a shadow on the layers below it, and the floater is brightly lit. 

Throughout the months of February and March, I drew numerous ATCs, ZTs and ZIAs which made use of all of these techniques. Here are a few examples.


That's all for now. More to come in the future. :)